How to Make a Birthday Cake at Home That Looks Professional
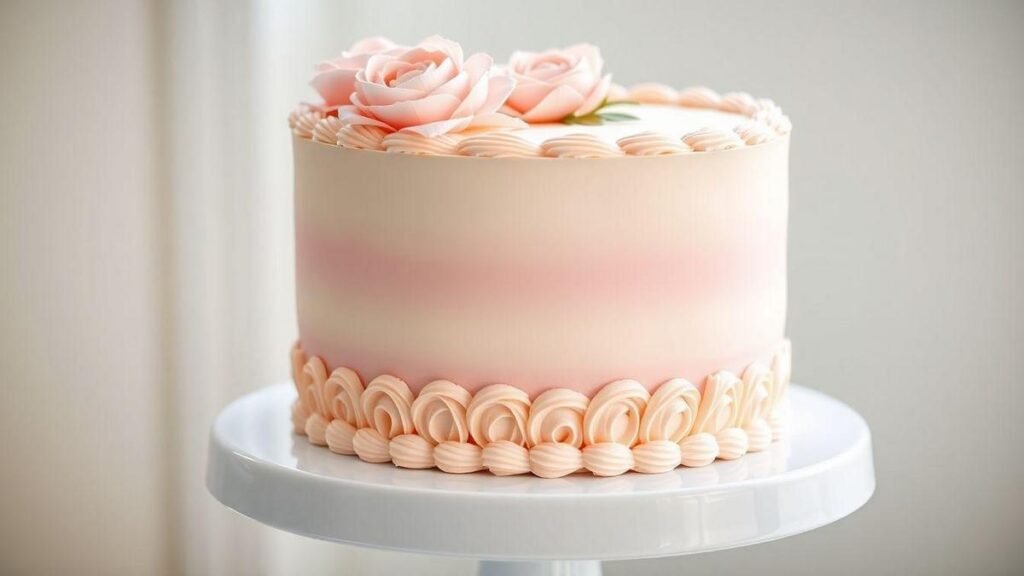
I love helping home bakers make a birthday cake that looks like it came from a bakery. It can feel intimidating, but with a few simple tools, the right techniques, and a little patience, you can get a polished result. This guide walks you through choosing the right recipe, baking and fully cooling, leveling layers, choosing an easy buttercream, applying a thin crumb coat, and decorating like a pro. Your personal touch is what makes it special.
Quick checklist
- Pick a stable recipe and plan your steps.
- Bake in the correct pans and cool completely on a wire rack.
- Level layers so they stack flat and even.
- Use buttercream, apply a thin crumb coat, chill, then finish frosting.
- Add color and small decorations for a polished look.
Step 1: Choose the Right Recipe
Start with a recipe that’s stable and forgiving. A classic vanilla birthday cake is my go-to: it rises well, slices cleanly, and pairs with many frostings and fillings. If you want reliable, simple formulas that perform well for layer cakes, try a collection of easy one-bowl cake recipes that are forgiving for home bakers.
What to consider
- Vanilla — reliable texture, mild flavor. Tip: use room-temperature eggs and butter.
- Chocolate / Yellow — richer taste. Tip: add a bit of sour cream for moistness.
- Pan size — affects baking time and height. Use the pan sizes listed in your recipe.
Step 2: Bake in the Right Pans
Using the correct pans helps cakes bake evenly and stack neatly. If you’re building a collection of tools, this simple guide to the best cake pans for beginner bakers helps you pick the right shapes and sizes.
Tools & tips
- 9-inch round pans — most common for layer cakes. Grease, line with parchment, then grease again.
- Springform — good for tall cakes; wrap the base in foil for water baths.
- Oven thermometer — ovens can be inaccurate; for more baking confidence, read these foolproof oven tips to avoid common temperature and timing issues.
Step 3: Let It Cool — Fully!
A warm cake will melt your frosting. Resist the urge to frost too soon.
Cooling timeline
- Cool in pan: 10–15 minutes — loosen edges before flipping to a wire rack.
- Cool on wire rack: 1–2 hours — fully cool before leveling and filling.
If your cake still seems a bit dry or has problems from baking, there are easy fixes like how to rescue dry cake or tips for a cake that sinks in the middle: how to fix a sunken cake.
Step 4: Level the Layers
Even, flat layers create a neat, bakery-style cake.
How to level
- Serrated knife — cut off domes by turning the cake slowly while you slice.
- Cake leveler — faster, straighter cuts; set the same height for each layer.
- Turntable — makes trimming and smoothing easier. For a full walk-through on building and stacking layer cakes with simple tools, see this guide to making a layer cake without a mixer.
Step 5: Choose a Frosting That’s Easy to Work With
For home bakers, buttercream is the best choice: it smooths well, holds shape, and is forgiving.
Simple Vanilla Buttercream (ingredients)
| Ingredient | Amount | Note |
|---|---|---|
| Unsalted butter | 1 cup (227 g) | Soft, not melted |
| Powdered sugar | 3–4 cups | Sift for smoothness |
| Vanilla extract | 1–2 tsp | Taste as you go |
| Milk or cream | 2–4 tbsp | Add for spreading texture |
| Salt | Pinch | Balances sweetness |
Method (short)
- Beat butter until creamy.
- Add powdered sugar slowly on low.
- Add vanilla and milk; beat until fluffy.
- Color with gel food coloring if desired (gel gives strong color with little liquid).
If you want an alternative finish, a glossy chocolate ganache or a simple glaze can give a different professional look without much extra effort.
Tip: If the frosting is too stiff, add a splash of milk; if too soft, chill briefly.
Step 6: Apply a Crumb Coat
A thin crumb coat traps crumbs so your final layer is smooth. Don’t skip it.
How-to
- Apply a thin layer of frosting over assembled layers with an offset spatula.
- Chill 15–30 minutes until firm to the touch.
- Finish with a smooth final coat.
Step 7: Decorate Like a Pro
You don’t need fancy tools to look fancy. Simple techniques go a long way — and there are many creative ideas that don’t require piping bags. For easy but beautiful finishes, try techniques from simple decorating ideas without piping bags.
Essential tools & uses
- Offset spatula — smooth sides and top; hold at a low angle.
- Bench scraper — get sharp edges; clean often.
- Piping bag & tips — borders, rosettes, shells. Start simple.
- Turntable — rotate while you work to keep motions steady.
Practice trick: try a border on a plate first to build confidence. One steady motion yields the best results.
Pro Tips for a Professional Finish
- Chill between steps — keeps frosting firm and manageable.
- Use gel food colors — intense color with minimal liquid.
- Warm your spatula under hot water and dry before smoothing for a glass-like finish.
- Trim cake boards to size — a neat base makes the whole cake look tidy.
- Match frosting and cake temperature — very cold cake plus cold frosting can crack.
- If things go wrong, check guides on fixing dry cake and repairing a sunken cake.
Flavor & Color Ideas
Mix flavors, fillings, and colors to match the party vibe.
Suggestions
- Lemon — filling: lemon curd or cream cheese. Colors: pale yellow & white.
- Chocolate — filling: raspberry jam or ganache. Colors: deep brown & gold.
- Vanilla — filling: strawberry or blueberry. Colors: pastel rainbow.
- Almond — filling: apricot or brown butter. Colors: soft pink & cream.
If you want to add fresh fruit without making the cake soggy, see these best ways to add fruit to cake and ideas for using fruit as a natural, beautiful topping: how to use fruit as a natural cake topping.
I once made a lemon-raspberry cake that tasted like summer — guests asked for seconds.
Storage Tips
Keep your cake fresh and pretty.
Where to store
- Room temperature — if frosting is stable (buttercream): 1–2 days.
- Fridge — for cream fillings or hot climates: 3–5 days. Bring to room temp before serving.
- Freezer — wrap slices in plastic and foil: up to 3 months. Thaw overnight in the fridge.
Celebrate in Style — From Your Own Kitchen
You don’t need a bakery to make a show-stopping cake. With a calm plan, a few tools, and steady hands, you can create something everyone admires. Breathe, take it step by step, and enjoy the process — your personal touch is the secret ingredient.
Read more at https://xendrie.com
Leave a Comment
I read comments and try to answer when I can. Tell me what you tried or where you got stuck.
Comment form (basic)
- Comment: Your message here
- Name: Required
- Email: Required (won’t be published)
- Website: Optional
Last Posts
- I Fixed My Dry Cake Like Magic
- I Proved Cakes Rise Without Baking Powder
- I Baked Cake With Only Cocoa
- I Finally Mastered Soft Whole Wheat Cake
Menu
- Home
- Recipes
- Tips
- Contact
Conclusion
A birthday cake can feel like climbing a mountain, but with simple tools, the right techniques, and a bit of patience, you’ll reach the summit. Leveling layers, a thin crumb coat, and smooth buttercream turn messy into polished. Most of all, your personal touch makes it memorable.
Frequently Asked Questions
Q: Do I need fancy tools to make my cake look professional?
A: No. A few basic tools and the right steps make a big difference. Plan and add your creative touch.
Q: How do I keep crumbs out of the final frosting?
A: Do a thin crumb coat first. Chill 15–30 minutes, then add the final layer.
Q: How can I level cake layers at home?
A: Use a serrated knife or a cake leveler. Cut slowly and steadily for even layers.
Q: What frosting is easiest for a smooth, pro look?
A: Buttercream — beat until fluffy, color if needed, and it smooths beautifully.
Q: How should I store the finished cake?
A: Cover and keep at room temp for a day, refrigerate for longer, and bring back to room temp before serving.

